Monday, August 29, 2016


Welcome to my photography class at Taravella Community School.


It is a pleasure having you in my class, I am sure that by the end of this term, you will have a much better understanding of the concept of manual exposure and will be able to control you camera at all times.

Please look at the addresses below for important info on how to keep up with our schedule.
I usually post every week the location and activity of our classes in my blog . Look on the right side under Taravella. If you use a phone, do not use the mobile screen as it does not show everything, look for the one you would see in your computer (full site).
A better way to get the information in real time, is to mark my photography page at Facebook with a like, that way you will get news automatically. I started with this system a while  ago, and it is proving very effective.

Now down to photography!!
Themes: I use themes in order to look for a way to train your eye to see thing with the camera. This exercise is not mandatory as nothing is compulsory in my class, you can use them at your own pace and convenience.
This week we will concentrate in "curves", please look at my examples here.

Should you feel like joining Flickr.com, please link your photostream to our Taravella group and upload your best 5 pictures so others can see and comment, you will be surprised!!!
Link to our Taravella Group, http://www.flickr.com/groups/taravella
Link to my personal photostream: https://www.flickr.com/photos/gbuten/

You can download my CAMERA BASICS PRESENTATION from:

Remember to subscribe to my blog for articles and interesting photography tips.
blogger-logo-small.png

Exposure practice online: 
Canon Canada has a wonderful site for practicing the different possibilities of exposure as we see in class. Remember that practice makes perfection, try to use this interactive to practice and check the results, as this is exactly the core of our class.

See below for useful links, and always bring your tripod, camera manual and a plastic bag (it rains a lot).

I recommend the following tripods as they are sturdy yet inexpensive compared to more sophisticated ones:

Manfrotto Compact Action Aluminum Tripod

Oben AC-1441 4-Section Aluminum Tripod with BA-111 Ball Head 

Benro  A-150EXU Digital Tripod Kit with Ball Head

Oben TT-100 Table Top Tripod, great for travelling!!!


Should you have any questions, please email me to:
gbphotgraphyusa@gmail.com
Remember to bring your camera manual and cheat sheet every class!!
PLEASE CONFIRM RECEPTION OF THIS EMAIL, SO I MAKE SURE YOU GOT THIS FIRST EMAIL WITH MY CONTACT INFO.

Machine generated alternative text:
Enhancing your

Machine generated alternative text:

This is my recommended photo store!!!!
Just click on the picture or  below!!!

Machine generated alternative text:
GET THE INSIDER'S LOOK 
BEST DEALS 
UPDATED WEEKLY 
Photography • Camcorders • Pro Audio 
Computers • Home Entertainment and more... 
SHOP NOW >


Best Regards, 

Gabe Butensky
954-649-4712


blogger-logo-small.png

flickr-logo.jpg


facebook logo-1.jpg


logo for sticker_small.jpg


Friday, January 29, 2016

Understanding Depth of Field in Photography

1

Depth of Field

Aperture and Depth of Field
Depth of Field (DOF) is the front-to-back zone of a photograph in which the image is razor sharp. As soon as an object (person, thing) falls out of this range, it begins to lose focus at an accelerating degree the farther out of the zone it falls; e.g. closer to the lens or deeper into the background. With any DOF zone, there is a Point of Optimum focus in which the object is most sharp. There are two ways to describe the qualities of depth of field - shallow DOF or deep DOF. Shallow is when the included focus range is very narrow, a few inches to several feet. Deep is when the included range is a couple of yards to infinity. In both cases DOF is measured in front of the focus point and behind the focus point. DOF is determined by three factors – aperture size, distance from the lens, and the focal length of the lens. Let’s look at how each one works.
2

Aperture

Small vs. Large Aperture
The aperture is the opening at the rear of the lens that determines how much light travels through the lens and falls on the image sensor. The size of the aperture’s opening is measured in f-stops - one of two sets of numbers on the lens barrel (the other being the focusing distance). The f-stops work as inverse values, such that a small f/number (say f/2.8) corresponds to a larger or wider aperture size, which results in a shallow depth of field; conversely a large f/number (say f/16) results in a smaller or narrower aperture size and therefore a deeper depth of field.
3

Small vs Large Aperture

Apertures Effect on Depth of Field
Manipulating the aperture is the easiest and most often utilized means to adjust Depth of Field. To achieve a deep, rich and expansive DOF, you’ll want to set the f-stop to around f/11 or higher. You may have seen this principle demonstrated when you look at photos taken outside during the brightest time of the day. In such a case, the camera is typically set at f/16 or higher (that Sunny 16 Rule) and the Depth of Field is quite deep - perhaps several yards in front of and nearly to infinity beyond the exact focus point. Let’s take a look at these two photos as examples. The photo on the left has an expansive DOF, most likely shot around noon (notice the short, but strong shadows), with an f/22 aperture. The photo on the right has an extremely shallow DOF; probably an f/2.8 aperture setting. However, to achieve an identical proper exposure, the shutter speed is probably closer to 1/1000th to compensate for the increased amount of light entering the lens at f/2.8.
4

Aperture Range

Aperture Range
The aperture range identifies the widest to smallest range of lens openings, i.e. f/1.4 (on a super-fast lens) to f/32, with incremental “stops” in between (f/2, f/2.8, f/4, f/5.6, f/8, f/11, f/16, and f/22). Each f-number is represents one “stop” of light, a stop is a mathematical equation (which is the focal length of the lens divided by the diameter of the aperture opening) that determines how much light that enters the lens regardless of the length of the lens. Such that an f/4 on a 50mm has smaller opening than an f/4 on a 200mm, but an equivalent amount of light travels through both lenses to reach the image sensor thus providing the same exposure. Each movement up the range (say f/2 to f.2.8) reduces the amount of light by one-half and each movement down the range (say f/11 to f/8) doubles the amount of light passing through the lens. It’s important to understand this concept and how it affects exposure because it works in tandem with the shutter speed (we’ll discuss this in another section) to establish a given exposure value. Basically, when you change the aperture size one stop, you have to shift the shutter speed one stop in the opposite direction to maintain a consistent exposure… and this change in aperture alters the depth of field (DOF) accordingly.
5

Distance from the Lens

The last element affecting depth of field is the distance of the subject from the lens - you can adjust the DOF by changing that distance. For example, the closer an object is to the lens (and the focus is set on that object) the shallower the DOF. Conversely, the reverse is true - the farther away an object is and focused on, the deeper the DOF. Changing the distance to subject is the least practical way to manipulate the depth of field, and by changing the distance from a subject to the lens, you immediately change your image’s composition. To maintain the compositional integrity of the shot, but still have the change in DOF from a distance, you can change the focal length (either by changing lenses or zooming in). Why does changing the focal length negate the effects on DOF? This is because the visual properties of a given lens either provide either greater DOF (shorter lenses) or shallower DOF (longer lenses). The physical properties of a lens at a given focal length also affect the depth of field. A shorter focal length lens (say 27mm) focused at 5 meters, set at f/4 has a deeper DOF (perhaps from 3 meters in front and 20 meters behind) than a longer focal length (say 300mm), also set at f/4 focused at 5 meters. The 300mm lens has a remarkably shallow depth of field. Incidentally, to help you with this, every lens has a manual with a DOF chart for each f/stop and the major focusing distances. DOF is just a matter of physics, and it’s important to grasp this concept.
 

Conclusion

Manipulation of depth of field is a good way to modify the characteristics of your photo, and manipulating the aperture is the ideal way to do this because it has little or no effect on composition. You simply need to change the shutter speed (or change the light sensitivity – ISO) to compensate for the changes in the exposure from the adjustments to the f-number. Changes in distance and focal length also affect DOF, but these changes have trade-offs in terms of composition. Therefore, changes to aperture are the best way to manipulate DOF without affecting a photo’s composition.

Some examples

The following pictures demostrate how DOF (depth of field) works.
I shot these images on a tripod being my ISO 100, speed was not a concern as this objects are not moving. In every picture, speed is a direct result of my ISO and APERTURE settings. Remember that you need to adjust your speed according to your ISO and f stop (APERTURE) in order to get a proper exposure. In every case the camera light meter was on a "0"value, right smack in the center of the scale. You can OVEREXPOSE OR UNDEREXPOSE, modifying the speed value (faster or slower) being this little adjustments a taste call.

Pictures 1 to 3: Using a BIG aperture
ISO 100, 1/25 SECS, AT F/1.8
Notice that these settings produce a very short DOF although the cameras are just a few inches apart. Focusing in one defocuses the others and the background  

Pictures 4: Using a SMALL aperture
ISO 100, 5 SECS, AT F/22
Notice that these settings produce a very deep DOF although the cameras are just a few inches apart. Focusing in one keeps everything in focus.


Pictures 5 to 8: Using a BIG aperture
ISO 100, 1/60 SECS, AT F/1.8
Notice that these settings produce a very short DOF although the markers and oranges are just a few inches apart. Focusing in one defocuses the others and the background  

Pictures 9: Using a SMALL aperture
ISO 100, 2.5 SECS, AT F/22
Notice that these settings produce a very deep DOF although the markers and oranges are just a few inches apart. Focusing in one keeps everything in focus.


Monday, February 23, 2015

What Makes A Photo Interesting?


Over 200,000 photos are uploaded every minute on Facebook alone. That’s over 9 billion new photos a month. With those kinds of numbers, a photo has to be really interesting for it to really stand out and grab people’s attention. The National Press Photographers Association (NPPA) wanted to know what exactly it is that makes a photo interesting. They wondered: Are people more naturally drawn to images taken by professionals rather than those snapped by amateurs? Was it the quality of the images that drew people in? What about subject matter, do people find images of people more interesting than landscapes?


People are naturally drawn to faces in a photograph, and having a unique subject really makes a photo stand out.

To get to the bottom of all their great big questions, the NPPA conducted a study, which utilized an eye tracking device to record the movements of the study participants to help the research team see “what people were drawn to in a photograph, how long they looked, if they read captions, and more.”

Not unexpectedly, the results from the study overwhelmingly weighed in the favor of the professional photographer. Though the study was conducted with an emphasis on photojournalism, in many cases the findings can be applied to other genres as well. Here are a few key takeaways from the study, that can use to improve the overall “likability” of your own images.
What Participants Found The Most Interesting About Photos
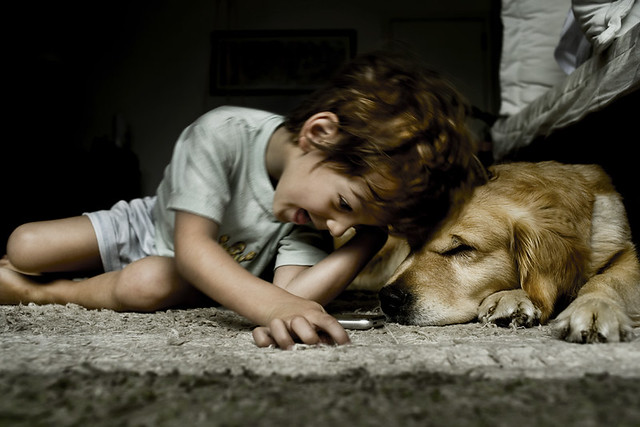
The first thing people look at in a photo are people’s faces and their expressions. People also spent a lot of time looking back and forth between different faces in an image to help “read” their interactions. From this information one can draw the conclusion that people’s attention is attracted quite easily by other people. If you are able to capture photos in which two or more individuals are having an interaction with one another, the greater chance you will have at getting people to look at your photo. If you capture portraits in which the subjects are making unusual or striking facial expressions, viewers will examine the photos with even greater attention to detail.

When looking at this photo, notice how your eye switches back and forth between the two subject’s faces. Their expressions draw in the eye and trigger the mind to start forming conclusions about what the relationship between the boy and his dog is like.
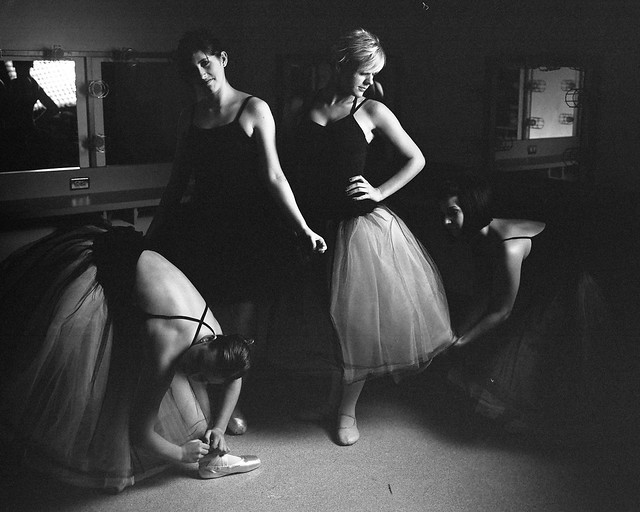
If a photo grants the viewer “special access” to an event they were not able to see in person, they are generally more captivated by it. In other words, take your viewers to a place they could not go to on their own. When looking at photos, people are drawn to what is unknown to them. Even when photographing well known landmarks or monuments, try gaining special access to areas that will allow you to photograph them from angles and perspectives that the average tourist would not be able to capture.

The lighting in this image adds drama to this image, but it is also interesting because the viewer is given access to a part of the ballerina’s life that is rarely seen–the candid moment’s between the dancers as they prepare to take stage.
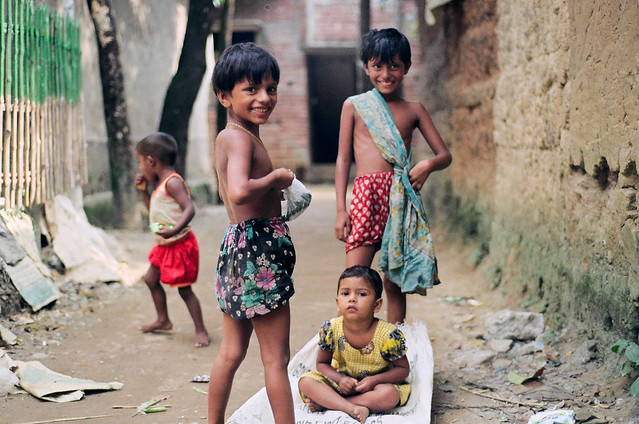
Nearly every participant polled by the NPPA mentioned the photo needed to tell a story in order to really draw them in and inspire them to know more about what is going on within the frame. This is part of the reason documentary photos received more attention than posed photos. While there’s a lot to be said for a great portrait, the ability to capture a story as it is happening is what viewers find most interesting about an image.

This photo not only has interesting faces to draw in the eye, it also tells the story of what day to day life for a child growing up in Bangladesh is like. The image is not posed, rather the boys are caught “in the moment”, making this image quite captivating.

On last thing worthy of mentioning is not the photo itself, but the caption that is displayed with the image. It was found that longer, more informational captions attract the most attention as the participants would go back and forth between the photo and the caption to help them establish context. Keeping that in mind when you’re posting images on your favorite websites and social media accounts could actually help attract more detailed attention to your images, get them shared by more users, and seen by more eyes.

Tuesday, December 9, 2014

Artserve reception on Thursday 12-11 at 6pm


Dear Students,

Artserve is having a reception for the new exhibit. This might be a good opportunity for student to take pictures in a gallery setting. The exhibit will showcase almost 200 pieces of art created by local emerging artists. This is a community event and is free. Artists and the local community come together from 6pm-8pm.

We were cordially invited by Rebecca Wilkner to assist and practice real life photography, for that we will meet directly at art serve, let me know if you are coming!!

1350 East Sunrise Blvd.


Ft Lauderdale, FL 33304


954-462-8190


www.artserve.org

www.artscalendar.com


Sunday, November 30, 2014

Splashing water and fruit sections


Splashing water drops:
Please bring to class the following, 

  • Tripod
  • Remote release for your camera.
  • Frying pan, about 1 foot wide, shallow if possible, black, clean if possible too.
  • White cardboard about 18 x 18 inches. Could be from a box too.
  • Clear wrapping paper, the one used for baskets, flower bouquets, or similar, it needs to be red, yellow, blue, etc, not transparent.
  • A zip lock bag, to cover your flash if necesary.
  • A soup spoon and a couple of forks.
  • Push pins.
  • Eyedroper.
  • And of course our regular paraphernalia of light modifiers stands, flashes, remotes, etc.


For this next exercise we will be shooting actual fruits, so:

Bring your camera, macro, tripod, flash, you know all the necessary gear.

Also bring some fruit that when sliced, shows some transparency.

A white plastic tray is necessary as we need to put our flashes below it to shoot through and get the effect.


Monday, September 8, 2014

Get ready to shoot the Super moon on Tuesday 9-9-14

Get ready to shoot the Super moon on Tuesday September the 9th.
Here are some tips:
Work at long focal lengths, 300 , if possible.
Put your camera on a tripod, use timer or a release.
Switch off IS or VR.
Use Manual Exposure mode.
Aperture, between f9 to f11.
Lower your ISO to 100.
Try to reach a speed fast enough (around 1/400) to start seeing the moon's actual details. If you are getting a white ball, your speed is not fast enough.
Shoot some shots to gauge your setting, mostly the speed.
Adjust your speed accordingly, till you see actual texture on the moon.
Try to tell a story, like shooting through a tree, branches, or elements that could give your a reference frame to your story.
If there is haze, do not get frustrated, it comes with the territory.
Best of luck and post on Flickr.com.


Monday, April 21, 2014

Flash photography on location


Flash photography on location.
Using your flash in manual mode.

For this exercise we are going to put our subject in the shade, under a tree canopy big enough to project shade over our subject and the surrounding area, not facing the main ambient light, the photographer will be looking towards the ambient light.

ON CAMERA FLASH:
First, put your flash on the camera and make sure that it is set to manual mode. You need to start at this point deciding on the exposure; set your ISO (for example 400), determine your aperture based on your desired DOF. For a shallow DOF, go to a wide aperture, so you can get a nice blurred background (bokeh).

With your flash off, expose for the highlights in the background, zero off your exposure and take a test shot. If you like the exposure, turn on your flash in manual mode, and set it to a lower power (1/8), take the shot and see if the light on your subject is right, soft and not too specular. Caveat: if you already set your camera to "high speed sync" mode (Canon) or "Auto FP" (Nikon), you should not have any problems shooting at high speeds, as a result of having a lot of ambient light available. If your camera does not support high speed sync, then pay attention to your speed and lower it to much lower levels, as 1/200 or 1/250. You do this modifying you aperture value, the smaller the aperture, the slower the speed that you will need. Or you can lower your ISO, to reach an equivalent exposure, without closing down your aperture that much.

If the light on your subject pleases you, play a little with the flash power and lower it a bit, or raise it at your convenience.

OFF CAMERA FLASH:
If you have a remote trigger or wireless communication between your camera and flash, you can detach your flash from your camera and start using it off camera, ie: mounting it on a tripod, or with the help of a light modifier (umbrella, soft-box, etc.).

Position your flash at a 45 degree angle to your subject and as close as possible, then start with the adjustment process like in the example above, in the On Camera Flash Section above.

This should be a process of no more than a minute, adjust your flash power and distance to your subject, till you reach a result that appeals to you. You can use the help of another person to hold a reflector for you, opposite to your flash and much closer, to compensate for the lack of light on that side.


This is a process of trial and adjustment, but the criteria is always the same, so practice and try to get use to it for our next class.

For the handy person:

It is always a good idea to use a bounce card, you can buy one of this for a dollar at Michaels, 


Thursday, April 17, 2014

The printing providers that I use

I mostly use these two places for my prints: They color correct my images to make them work with their printers' color space.

http://www.mpix.com/

http://www.bayphoto.com/

Occasionally I might print at Costco, but just prints that are not important, mostly I use them for the convenience of having the prints within the hour.
Costco, or any other pharmacy style machine do not color correct your prints, so they will look just ok, either dark or without much detail in some areas.

http://www.mpix.com/

http://www.bayphoto.com/

Monday, April 7, 2014

Taravella Level 2 Flash recap.

Last Thursday, I introduced flash photography to most of the class; as a recap I would like to make a list below of the equipment that I brought to class, should you decide to purchase similar elements.


  • 43"Apollo Orb Softbox by Wescott  (BH $ 130)
  • 30"Octagon Softbox by Cowboy Studios (Ebay around $ 40)
  • Maxxum 4000 AF Flash (1985) (Ebay around $ 35) very powerful and inexpensive.
  • Remote triggers (Ebay around $ 10), will work well with any flash
  • 42" Reflector (Ebay around $ 40) 5 in 1.
  • Inexpensive light stand (Ebay around $ 25) Make sure that is sturdy.
If you are serious about flash photography, it is always nice to have at least some inexpensive elements to practice either at class or school.  Of course I will bring every class several Maxxums and triggers for your convenience as well as the softboxes.

There is a great little gadget, a small softbox for portraits, (Ebay or BH around $ 20), it is foldable and very light.
This is an example: 

Vello Universal Softbox for Portable Flash (Large)


So, getting back to the first class: 
  • First I showed how a TTL flash mounted on camera with a dome diffuser pointing to the subject directly would project a harsh flat light on the model's face.
  • Then I pointed the flash to the ceiling on a 45 degree angle to find out that although less harsh, the light was still not creating any contrast.
  • Again, I pointed the flash upwards and a bit back, this time the light was very soft but deeply flat, no contrast, a nice passport picture.
  • So I mounted the 42"softbox with a Nikon SB-910 in iTTL mode, put it at a 45 degree angle to our male model and voila!! I got a more 3 dimensional portrait, more sculptorical, with a nice lighter side on the left and a subtle shadow on the right giving the 2 dimensional picture an immediate POP of contrast, no flat anymore eh!!
  • After that I used FEC, flash exposure compensation to decrease the power of the flash just a bit and achieve a result that was more pleasing to me.
  • Until this moment I was using iTTL mode, so the camera and the flash pretty much did all the work and gave me a nice result. This is like shooting (without flash) in one of the priority modes, you define the f stop or speed and the ISO and the camera accommodates the exposure.
  • But I like to customize and tweak everything, so I went to ALL MANUAL, yes, manual flash and manual exposure. Now I was in control of everything.
  • The camera and the flash were communicating through light pre_flashes, so I commanded my flash from my camera.
  • First I put the flash to 1/16th of its power, having set  the camera to: 400 ISO, f 5.6 with a speed of 1/60. Remember speed only affects the ambient light not the light of the flash over my subject.
  • I shot, and liked the results, but if I remembre well the light was a little harsh, decrease the power to 1/32 and the results were much more pleasing.
  • Remember, flash photography is quite abstract until you start to discover it and practice it a little bit. Then, everything becomes quite apparent all of the sudden. 
Ok, hopefully I was able to recap everything, next class we will practice on location, so bring your equipment if you have some. I will also bring Rosita for your delight!!

Comments below are more than welcome, please be constructive!!

Taravella Level 1

If you are taking my Level 1 photography class, go the the menu on the right and do a search using the following string: Depth of field (DOF)

You will find several articles that I posted over the years and come be very handy for our second class.

See you tomorrow!!

The picture below is a classical example of macro photography with a shallow DOF.

https://www.flickr.com/photos/gbuten/13252891243/

Thursday, March 13, 2014

Taravella Breaking News: Photography Level 2-needs your action to become a reality

GOOD NEWS:
I just had a meeting at Taravella and I have been authorized to run a Photography Level 2 class on Thursdays nights starting in April (this coming term), the school is going to invest in photographic equipment, a dedicated room and I will be able to teach in a much more sophisticated way. 
I want to concentrate in studio photography, use of flashes, lights, posing, perform experimental creative photography; play with mixes of oil and water, shoot ice falling on water and splashing, drops falling on water, painting with light in depth, product shooting. In other words it will be a much more advanced approach to photography than Level 1 and a lot of fun. I will give you lots of hands-on tips and recipes for different situations, we might even create special projects (metal, canvas, acrylic) and experiment with printing through different companies across the country.
I will help you make your pictures look like the pros!!!


Let me know asap if you are interested in assisting to this class, as the school needs a minimum number of people to buy the equipment and run the class, with such a short notice.

Looking for the light, with diffusers and light modifiers.

Friday, January 24, 2014

Microsoft updates Windows Raw support - adding 22 cameras

http://www.microsoft.com/en-us/download/details.aspx?id=


Microsoft has announced a Raw compatibility update for Windows Vista, 7 and 8, adding support for 22 cameras. This includes the previous generation of Canon Rebel cameras, along with the Pentax K-01, Sony RX100 and the Fujifilm X10. It also adds support for the Canon EOS 6D and Nikon D600, along with 'richer' support for images shot in AdobeRGB.


Friday, January 17, 2014

Choosing and Using a Lens for a DSLR

Choosing and Using a Lens for a DSLR

By 
Choosing a lens can be a daunting task for all of the reasons mentioned above, so I pulled together some info from my own experiences, as well as those of other shutterbugs. In this article, we'll help you decode "lens speak." We'll also explain popular types of lenses and the types of photography where they excel.

Deciphering lens lingo

Reading the name of a lens can seem a bit like translating a different language. But once you know what each part means, you'll find that the name gives you lots of essential information.
Here are a couple examples that we've broken down:
ALT TEXTThe name of a lens will give you a lot of important info about the series, focal length, maximum aperture and image stabilization.
Compatibility: brand, series, and sensor size
Of course, you want to make sure any lens you choose will fit and work properly with your camera. If you're buying a Nikon lens for a Nikon camera, that's a pretty good indicator that you're on the right track. However, if you're buying a third-party lens, you'll want to be sure the lens is intended for your brand of camera.
After confirming the lens will work with your brand of SLR, the next step is seeing if the lens is compatible with your particular camera's model or series.
Different series or lines of digital SLRs, even within the same brand, can use different lens mounts. If you choose a lens that's not intended for your series of camera, it may not work at all, or you may lose functionality, like the ability to autofocus. For example, if you have a Nikon digital SLR camera like the D3100, you'll want to be sure you choose a lens that's listed as AF-S or AF-S DX to ensure full compatibility. You can generally find this info in your camera's owner's manual if you're not sure.
Another thing to consider is the image sensor in your camera. There are basically two different sensor sizes:
  1. "full frame" sensors, which are the same size as one frame of 35mm film, like those in traditional film SLRs; these are generally in higher-end cameras
  2. smaller image sensors, like those found in most digital SLR cameras
You'll want to keep your camera's sensor size in mind when you select a lens, because mismatching can give you undesirable effects. For example, a small-frame lens (DX models for Nikon and EF-S for Canon) on a full-frame camera may not work at all, and if it does, it may only let you capture photos at a reduced resolution.
On the other hand, you can usually use a full-frame sensor lens on a small-sensor camera, but your focal length will be subject to "crop factor." That is, a full-frame lens (intended for a camera with a larger sensor) will project a larger image circle than your image sensor can capture, so it'll appear as if you've zoomed in slightly on your subject. For more information on this complex topic, see the discussion in our digital camera glossary.
full frame vs. small frameThere are two main types of image sensors: full frame sensors, which are the same size as one frame of 35mm film, and small frame sensors which are found on most digital SLRs.
Focal length
The next info you'll see in a lens description is the focal length. It'll either be a single number or a range of numbers. A single number indicates that you're looking at a lens with a fixed focal length, sometimes called a "prime" lens. You won't be able to zoom in or out from your subject — you'll have to move closer or further away to change your magnification. A range of numbers reflects the minimum and maximum focal lengths on a zoom lens, which allows you to get closer or further from your subject without physically moving.
Lenses can be grouped into a few different categories based on focal length. We'll touch on those we've seen most often: wide-angle,telephoto, and macro.
A wide-angle lens captures a wider view of a scene than the human eye can see, with a focal length or range that's generally less than 35mm. This lens can be great for outdoor shooting when you want to give a sense of the vast size of a location — a sweeping mountain range or a towering skyscraper. You'll find a wide-angle lens is also useful when trying to get a group shot of a lot of people in a little room.
It's worth noting that wide-angle lenses aren't an optimum choice for portraiture. They produce potentially unflattering people shots because they may make people's faces appear stretched out. We'll get into the optimum focal length for flattering portraits a little later in the article.
photoHere are a couple photos of the same subject, taken at different focal lengths. An abbey photographed with my 18-55mm lens at 55mm (above) and then with my 55-200mm lens at 185mm (below).
photo
telephoto lens allows you to zoom in on or magnify subjects that are far away. These can be fixed focal length or zoom lenses. The zoom lenses allow you to select the magnification that's right for your subject or scene. You can adjust the focal length to capture candid photos of a birthday party in your yard or focus in on a single child. The higher the maximum focal length, the further away you'll be able to see.
macro lens lets you get really close to your subject — most of the time mere inches away — but still get crisp and clear photos. It's designed for taking close-ups of flowers and other subjects where you'll really want to show the texture. Macro lenses usually come in fixed focal lengths, and can also be a great choice for shooting portraits or even everyday photography.
MacroA macro lens is helpful for getting extreme close-ups that expose the details of your subject.
Aperture
Aperture describes the size of the opening in a lens that determines the amount of light let into the camera, and it affects a number of different aspects of photography. It's measured in "f-stops." A higher f-stop number corresponds to a smaller opening, which admits less light. SLR lenses will typically show a single maximum f-stop like f/1.8 or a range of maximum f-stops like f/3.5-5.6. You'll commonly see a range of maximum apertures when you're looking at a zoom lens with a range of focal lengths, while prime lenses will have only one maximum f-stop number.
MacroA lens at minimum aperture (left) lets in only a small amount of light, while a lens at maximum aperture (right) lets in the maximum amount of light possible.
Some lenses are described as being "fast." This relates directly to aperture — a lens with a large maximum aperture (indicated by a lower f-stop number) lets more light into the camera. By letting more light into the camera, you can shoot with faster shutter speeds in settings with less light, and your photos will still be properly exposed.
Faster shutter speeds help you "freeze" images of moving subjects more effectively. This makes a fast lens ideal for shooting indoor sports, a toddler's birthday party, and other events that feature rapidly moving action. Keep in mind, however, that fast lenses use larger, more costly glass elements that can result in added size, weight, and a higher price tag.
MacroMacro
The aperture setting also affects how much of your photo is in focus, also known as depth of field. For example, only the bike is in focus in the left image (taken at f/2.8), while both the bike and the background are in focus in the right image (taken at f/22). Lenses with a large maximum aperture give you more control over depth of field, an important aspect of creative photography.
You may also see lenses where either the number of aperture blades or the shape of the aperture blades is described. The aperture opening is created by a series of blades that form a circular hole that lets light pass into the camera. The blades contract and expand to form smaller and larger holes, respectively.
The closer the shape of the hole is to a perfect circle, the better the resulting photos. Because of this, you may see manufacturers increase the number of aperture blades or use curved aperture blades on some high-quality lenses.
Image stabilization
If your camera doesn't have built-in image stabilization, you may want to invest in a lens that has its own image stabilization. You'll see this in the lens description with an IS or VR (indicating "image stabilization" or "vibration reduction," respectively). Image stabilization can be particularly important for telephoto lenses where handshake is magnified as you zoom in on a subject.

Describing the internal components of a lens

You may see information about the makeup of the lens itself — the number of lens elements, the shape of the lens elements, or the type of glass used in those elements. These build features can affect the overall quality of the image, so if you want to shoot extremely crisp, accurate, professional-quality photos, it's good to pay attention to them.
For example, you may see a lens that has aspherical lens elements. The aspherical shape allows the lens elements to be smaller, which also allows the overall lens to be smaller and lighter. It also results in photos where the focus is crystal clear across the entire field of the lens — from one edge to the other edge.
Low-dispersion glass is another indicator of quality. It minimizes "color fringing," where you may see different bands of color on the edge of subjects.

Other considerations when choosing a lens

Pay attention to the size and weight of the lens. While it may not be a deal-breaker if the lens you end up with is big and bulky, it'll influence the bag you choose to cart it around. And it'll certainly affect whether or not it becomes a lens you take on long hiking trips where backpack space is limited.
If your lens weighs more than your camera body, as is sometimes the case, you may end up attaching the tripod to the lens to keep the weight distribution balanced. Most heavier lenses come with a tripod ring, making it easy to secure the lens directly to the tripod.

Common shooting scenarios and the types of lenses we'd use

Below, we've outlined a few common shooting scenes and the lenses that we'd use in these scenarios. Remember to keep in mind that a variety of lenses could work in many situations, but these would be our ideal choices.
All-in-one for travel 
If we are traveling and don't want to carry a heavy bag around with us, we'll probably choose a zoom lens that ranges from wide-angle (18-20mm) to telephoto (200-300mm). That'll give us the opportunity to shoot wide environmental shots as well as close-ups of distant objects without having to change lenses. Switching lenses in the field can be nerve-wracking as one tries to keep dust and dirt out of two different lenses as well as the camera body.
Portraits 
The most flattering focal range for portrait photography generally falls between 80 and 150mm, remembering to account for crop factor. For an artistically blurred background, choose a lens with a large maximum aperture, like a macro lens.
Landscapes and expansive outdoor shots 
If we are trying to capture sweeping environmental shots, like a tropical beach, a monstrous skyscraper, or a snow-capped mountain range, we'll probably go with a wide-angle zoom lens. That way, we can frame the scene and record the scope of our subject.
For these types of shots, a UV filter will minimize haziness and glare, while a polarizing filter will increase contrast between colors. We'll cover filters in more detail later on in this article.
Nature photography 
If we were shooting nature photography, we'd want a telephoto lens that would let us zoom in on distant wildlife. But we'd also want a lens with short minimum focal distance so we could snap macro shots right next to plant life.
Indoor photos 
There's typically less light when shooting indoors, so we'd look for a lens with a large maximum aperture. That'd let us use a faster shutter speed and still get properly exposed photos. Here, a wide-angle lens will give you the ability to capture the entirety of a room and all the people within it whereas a lens with a higher focal length gives you better photographs of individuals.
Ideal for action 
For action, we'd want a lens with telephoto capability, so we can get close to the action, even when it's occurring across the field. And ideally, a large maximum aperture combined with a tripod will let us really freeze the action of any sporting event.

Lens storage and care

Tamrac%20System%206%20camera%20bagA good camera bag will protect your camera bodies and extra lenses while keeping them accessible
Once you purchase a lens, you'll want to keep it at its best. And a good way to do that is to protect the lens while it's not in use. Keep it in a camera bag when it's not attached to your camera.
You can also invest in lens clothes and brushes to gently remove dust and minor debris from the front of the lens without scratching or otherwise damaging the glass.
It seems pretty obvious to keep the lens cap on the lens when it's not in use, but we know from experience that lens caps are really easy to misplace or lose all together. So here's one tip that we've used with success: purchase a little bit of Velcro® from a craft store, then attach one side of the Velcro to the outside of the lens cap, and the other side to the your camera body or the outside of a frequently used camera bag. This will give you a handy place to store your lens cap when you're shooting photos.

Expand your photography potential with filters and other extras

Polarizing filterFilters offer protection for your lens and can give you a variety of photographic effects.
Filters
Filters, first and foremost, offer protection for the expensive glass lens. Some filters also add a variety of effects to your photographs.
While some effects can be reproduced using photo editing software, it's helpful to have the filter in the field with you so you can adjust your scene and filter to get the desired effect.
There are quite a few different types of filters. We'll give a brief overview of the most popular filters and what they'll do for your photographs.
Clear
A clear filter protects your lens from minor bumps and scratches. In fact, you can purchase a clear filter and keep it on a lens the entire time you use it. It won't protect your lens against major bumps or falls, but it's much less expensive to replace a filter that swings into the wall than to replace a lens. Because these filters are perfectly clear, they offer no optical effects.
UV and haze reduction
A UV filter absorbs UV light as you snap a picture and gives photos a gentle warming effect. A UV and haze filter also minimizes the haze that settles in the distance of landscape photos. One of these filters can help you capture crystal clear panoramic photographs.
Photo with polarizing filterA polarizing filter is a good choice for outdoor photography — you'll get photos with increased contrast between blue skies and white clouds.
Polarizer
A polarizing filter is used in outdoor photography. It reduces reflections on non-metallic surfaces like water, ice, and glass. And it increases the contrast between colors, which makes backdrops seem to pop, like a bright blue sky with white clouds. A circular polarizing filter features an adjustable ring. Adjust the ring as you look through the viewfinder, then snap a photo when the sky looks like it's at its bluest point.
Lens hoods
These prevent sunlight from creating "flare" — streaks of light that appear in your pictures — and are sometimes included with lenses. Light at errant angles, especially from the side, can creep into photos and create flare by reflecting across the surface of the lens. Hoods minimize this effect by blocking light from sides of the lens, so your photos are only exposed with the light you want.