Monday, August 29, 2016


Welcome to my photography class at Taravella Community School.


It is a pleasure having you in my class, I am sure that by the end of this term, you will have a much better understanding of the concept of manual exposure and will be able to control you camera at all times.

Please look at the addresses below for important info on how to keep up with our schedule.
I usually post every week the location and activity of our classes in my blog . Look on the right side under Taravella. If you use a phone, do not use the mobile screen as it does not show everything, look for the one you would see in your computer (full site).
A better way to get the information in real time, is to mark my photography page at Facebook with a like, that way you will get news automatically. I started with this system a while  ago, and it is proving very effective.

Now down to photography!!
Themes: I use themes in order to look for a way to train your eye to see thing with the camera. This exercise is not mandatory as nothing is compulsory in my class, you can use them at your own pace and convenience.
This week we will concentrate in "curves", please look at my examples here.

Should you feel like joining Flickr.com, please link your photostream to our Taravella group and upload your best 5 pictures so others can see and comment, you will be surprised!!!
Link to our Taravella Group, http://www.flickr.com/groups/taravella
Link to my personal photostream: https://www.flickr.com/photos/gbuten/

You can download my CAMERA BASICS PRESENTATION from:

Remember to subscribe to my blog for articles and interesting photography tips.
blogger-logo-small.png

Exposure practice online: 
Canon Canada has a wonderful site for practicing the different possibilities of exposure as we see in class. Remember that practice makes perfection, try to use this interactive to practice and check the results, as this is exactly the core of our class.

See below for useful links, and always bring your tripod, camera manual and a plastic bag (it rains a lot).

I recommend the following tripods as they are sturdy yet inexpensive compared to more sophisticated ones:

Manfrotto Compact Action Aluminum Tripod

Oben AC-1441 4-Section Aluminum Tripod with BA-111 Ball Head 

Benro  A-150EXU Digital Tripod Kit with Ball Head

Oben TT-100 Table Top Tripod, great for travelling!!!


Should you have any questions, please email me to:
gbphotgraphyusa@gmail.com
Remember to bring your camera manual and cheat sheet every class!!
PLEASE CONFIRM RECEPTION OF THIS EMAIL, SO I MAKE SURE YOU GOT THIS FIRST EMAIL WITH MY CONTACT INFO.

Machine generated alternative text:
Enhancing your

Machine generated alternative text:

This is my recommended photo store!!!!
Just click on the picture or  below!!!

Machine generated alternative text:
GET THE INSIDER'S LOOK 
BEST DEALS 
UPDATED WEEKLY 
Photography • Camcorders • Pro Audio 
Computers • Home Entertainment and more... 
SHOP NOW >


Best Regards, 

Gabe Butensky
954-649-4712


blogger-logo-small.png

flickr-logo.jpg


facebook logo-1.jpg


logo for sticker_small.jpg


Friday, January 29, 2016

Understanding Depth of Field in Photography

1

Depth of Field

Aperture and Depth of Field
Depth of Field (DOF) is the front-to-back zone of a photograph in which the image is razor sharp. As soon as an object (person, thing) falls out of this range, it begins to lose focus at an accelerating degree the farther out of the zone it falls; e.g. closer to the lens or deeper into the background. With any DOF zone, there is a Point of Optimum focus in which the object is most sharp. There are two ways to describe the qualities of depth of field - shallow DOF or deep DOF. Shallow is when the included focus range is very narrow, a few inches to several feet. Deep is when the included range is a couple of yards to infinity. In both cases DOF is measured in front of the focus point and behind the focus point. DOF is determined by three factors – aperture size, distance from the lens, and the focal length of the lens. Let’s look at how each one works.
2

Aperture

Small vs. Large Aperture
The aperture is the opening at the rear of the lens that determines how much light travels through the lens and falls on the image sensor. The size of the aperture’s opening is measured in f-stops - one of two sets of numbers on the lens barrel (the other being the focusing distance). The f-stops work as inverse values, such that a small f/number (say f/2.8) corresponds to a larger or wider aperture size, which results in a shallow depth of field; conversely a large f/number (say f/16) results in a smaller or narrower aperture size and therefore a deeper depth of field.
3

Small vs Large Aperture

Apertures Effect on Depth of Field
Manipulating the aperture is the easiest and most often utilized means to adjust Depth of Field. To achieve a deep, rich and expansive DOF, you’ll want to set the f-stop to around f/11 or higher. You may have seen this principle demonstrated when you look at photos taken outside during the brightest time of the day. In such a case, the camera is typically set at f/16 or higher (that Sunny 16 Rule) and the Depth of Field is quite deep - perhaps several yards in front of and nearly to infinity beyond the exact focus point. Let’s take a look at these two photos as examples. The photo on the left has an expansive DOF, most likely shot around noon (notice the short, but strong shadows), with an f/22 aperture. The photo on the right has an extremely shallow DOF; probably an f/2.8 aperture setting. However, to achieve an identical proper exposure, the shutter speed is probably closer to 1/1000th to compensate for the increased amount of light entering the lens at f/2.8.
4

Aperture Range

Aperture Range
The aperture range identifies the widest to smallest range of lens openings, i.e. f/1.4 (on a super-fast lens) to f/32, with incremental “stops” in between (f/2, f/2.8, f/4, f/5.6, f/8, f/11, f/16, and f/22). Each f-number is represents one “stop” of light, a stop is a mathematical equation (which is the focal length of the lens divided by the diameter of the aperture opening) that determines how much light that enters the lens regardless of the length of the lens. Such that an f/4 on a 50mm has smaller opening than an f/4 on a 200mm, but an equivalent amount of light travels through both lenses to reach the image sensor thus providing the same exposure. Each movement up the range (say f/2 to f.2.8) reduces the amount of light by one-half and each movement down the range (say f/11 to f/8) doubles the amount of light passing through the lens. It’s important to understand this concept and how it affects exposure because it works in tandem with the shutter speed (we’ll discuss this in another section) to establish a given exposure value. Basically, when you change the aperture size one stop, you have to shift the shutter speed one stop in the opposite direction to maintain a consistent exposure… and this change in aperture alters the depth of field (DOF) accordingly.
5

Distance from the Lens

The last element affecting depth of field is the distance of the subject from the lens - you can adjust the DOF by changing that distance. For example, the closer an object is to the lens (and the focus is set on that object) the shallower the DOF. Conversely, the reverse is true - the farther away an object is and focused on, the deeper the DOF. Changing the distance to subject is the least practical way to manipulate the depth of field, and by changing the distance from a subject to the lens, you immediately change your image’s composition. To maintain the compositional integrity of the shot, but still have the change in DOF from a distance, you can change the focal length (either by changing lenses or zooming in). Why does changing the focal length negate the effects on DOF? This is because the visual properties of a given lens either provide either greater DOF (shorter lenses) or shallower DOF (longer lenses). The physical properties of a lens at a given focal length also affect the depth of field. A shorter focal length lens (say 27mm) focused at 5 meters, set at f/4 has a deeper DOF (perhaps from 3 meters in front and 20 meters behind) than a longer focal length (say 300mm), also set at f/4 focused at 5 meters. The 300mm lens has a remarkably shallow depth of field. Incidentally, to help you with this, every lens has a manual with a DOF chart for each f/stop and the major focusing distances. DOF is just a matter of physics, and it’s important to grasp this concept.
 

Conclusion

Manipulation of depth of field is a good way to modify the characteristics of your photo, and manipulating the aperture is the ideal way to do this because it has little or no effect on composition. You simply need to change the shutter speed (or change the light sensitivity – ISO) to compensate for the changes in the exposure from the adjustments to the f-number. Changes in distance and focal length also affect DOF, but these changes have trade-offs in terms of composition. Therefore, changes to aperture are the best way to manipulate DOF without affecting a photo’s composition.

Some examples

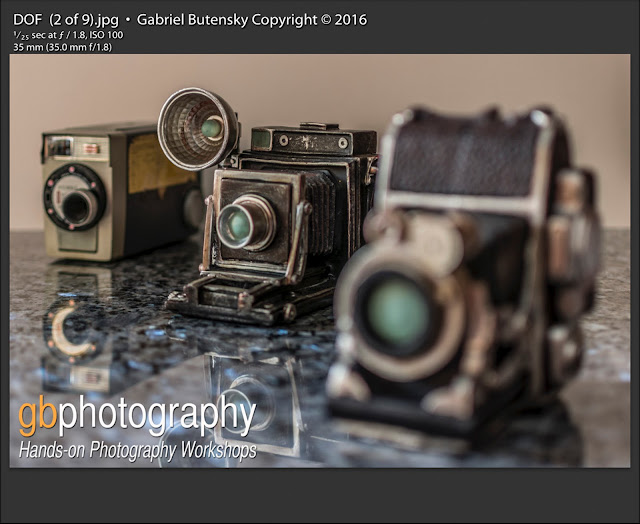
The following pictures demostrate how DOF (depth of field) works.
I shot these images on a tripod being my ISO 100, speed was not a concern as this objects are not moving. In every picture, speed is a direct result of my ISO and APERTURE settings. Remember that you need to adjust your speed according to your ISO and f stop (APERTURE) in order to get a proper exposure. In every case the camera light meter was on a "0"value, right smack in the center of the scale. You can OVEREXPOSE OR UNDEREXPOSE, modifying the speed value (faster or slower) being this little adjustments a taste call.

Pictures 1 to 3: Using a BIG aperture
ISO 100, 1/25 SECS, AT F/1.8
Notice that these settings produce a very short DOF although the cameras are just a few inches apart. Focusing in one defocuses the others and the background  

Pictures 4: Using a SMALL aperture
ISO 100, 5 SECS, AT F/22
Notice that these settings produce a very deep DOF although the cameras are just a few inches apart. Focusing in one keeps everything in focus.


Pictures 5 to 8: Using a BIG aperture
ISO 100, 1/60 SECS, AT F/1.8
Notice that these settings produce a very short DOF although the markers and oranges are just a few inches apart. Focusing in one defocuses the others and the background  

Pictures 9: Using a SMALL aperture
ISO 100, 2.5 SECS, AT F/22
Notice that these settings produce a very deep DOF although the markers and oranges are just a few inches apart. Focusing in one keeps everything in focus.


Monday, February 23, 2015

What Makes A Photo Interesting?


Over 200,000 photos are uploaded every minute on Facebook alone. That’s over 9 billion new photos a month. With those kinds of numbers, a photo has to be really interesting for it to really stand out and grab people’s attention. The National Press Photographers Association (NPPA) wanted to know what exactly it is that makes a photo interesting. They wondered: Are people more naturally drawn to images taken by professionals rather than those snapped by amateurs? Was it the quality of the images that drew people in? What about subject matter, do people find images of people more interesting than landscapes?


People are naturally drawn to faces in a photograph, and having a unique subject really makes a photo stand out.

To get to the bottom of all their great big questions, the NPPA conducted a study, which utilized an eye tracking device to record the movements of the study participants to help the research team see “what people were drawn to in a photograph, how long they looked, if they read captions, and more.”

Not unexpectedly, the results from the study overwhelmingly weighed in the favor of the professional photographer. Though the study was conducted with an emphasis on photojournalism, in many cases the findings can be applied to other genres as well. Here are a few key takeaways from the study, that can use to improve the overall “likability” of your own images.
What Participants Found The Most Interesting About Photos
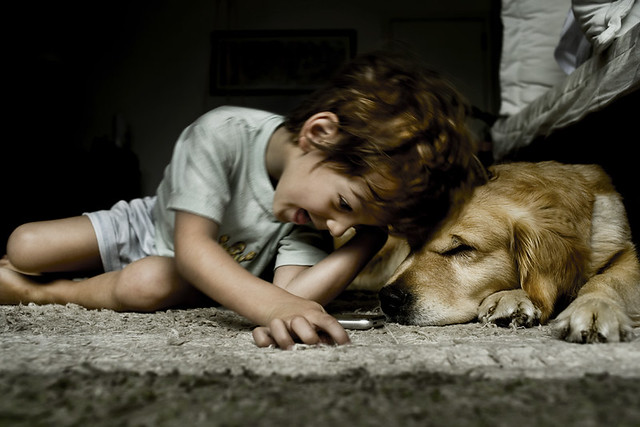
The first thing people look at in a photo are people’s faces and their expressions. People also spent a lot of time looking back and forth between different faces in an image to help “read” their interactions. From this information one can draw the conclusion that people’s attention is attracted quite easily by other people. If you are able to capture photos in which two or more individuals are having an interaction with one another, the greater chance you will have at getting people to look at your photo. If you capture portraits in which the subjects are making unusual or striking facial expressions, viewers will examine the photos with even greater attention to detail.

When looking at this photo, notice how your eye switches back and forth between the two subject’s faces. Their expressions draw in the eye and trigger the mind to start forming conclusions about what the relationship between the boy and his dog is like.
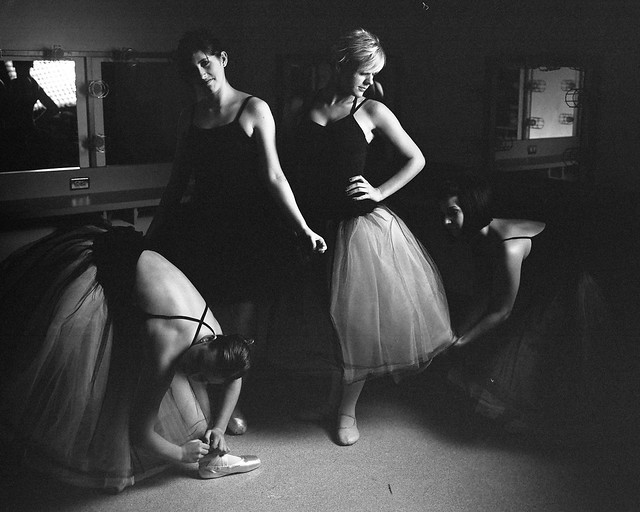
If a photo grants the viewer “special access” to an event they were not able to see in person, they are generally more captivated by it. In other words, take your viewers to a place they could not go to on their own. When looking at photos, people are drawn to what is unknown to them. Even when photographing well known landmarks or monuments, try gaining special access to areas that will allow you to photograph them from angles and perspectives that the average tourist would not be able to capture.

The lighting in this image adds drama to this image, but it is also interesting because the viewer is given access to a part of the ballerina’s life that is rarely seen–the candid moment’s between the dancers as they prepare to take stage.
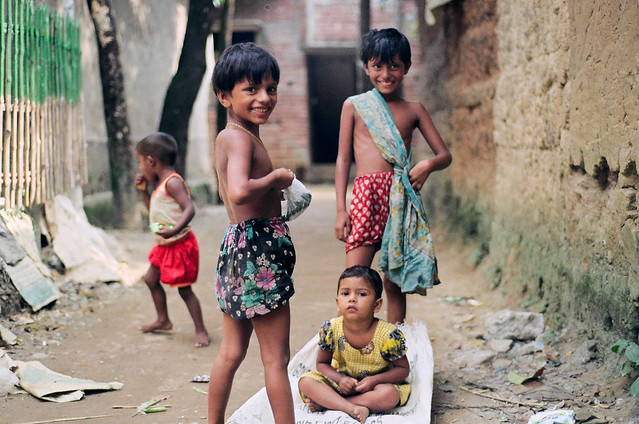
Nearly every participant polled by the NPPA mentioned the photo needed to tell a story in order to really draw them in and inspire them to know more about what is going on within the frame. This is part of the reason documentary photos received more attention than posed photos. While there’s a lot to be said for a great portrait, the ability to capture a story as it is happening is what viewers find most interesting about an image.

This photo not only has interesting faces to draw in the eye, it also tells the story of what day to day life for a child growing up in Bangladesh is like. The image is not posed, rather the boys are caught “in the moment”, making this image quite captivating.

On last thing worthy of mentioning is not the photo itself, but the caption that is displayed with the image. It was found that longer, more informational captions attract the most attention as the participants would go back and forth between the photo and the caption to help them establish context. Keeping that in mind when you’re posting images on your favorite websites and social media accounts could actually help attract more detailed attention to your images, get them shared by more users, and seen by more eyes.

Tuesday, December 9, 2014

Artserve reception on Thursday 12-11 at 6pm


Dear Students,

Artserve is having a reception for the new exhibit. This might be a good opportunity for student to take pictures in a gallery setting. The exhibit will showcase almost 200 pieces of art created by local emerging artists. This is a community event and is free. Artists and the local community come together from 6pm-8pm.

We were cordially invited by Rebecca Wilkner to assist and practice real life photography, for that we will meet directly at art serve, let me know if you are coming!!

1350 East Sunrise Blvd.


Ft Lauderdale, FL 33304


954-462-8190


www.artserve.org

www.artscalendar.com


Sunday, November 30, 2014

Splashing water and fruit sections


Splashing water drops:
Please bring to class the following, 

  • Tripod
  • Remote release for your camera.
  • Frying pan, about 1 foot wide, shallow if possible, black, clean if possible too.
  • White cardboard about 18 x 18 inches. Could be from a box too.
  • Clear wrapping paper, the one used for baskets, flower bouquets, or similar, it needs to be red, yellow, blue, etc, not transparent.
  • A zip lock bag, to cover your flash if necesary.
  • A soup spoon and a couple of forks.
  • Push pins.
  • Eyedroper.
  • And of course our regular paraphernalia of light modifiers stands, flashes, remotes, etc.


For this next exercise we will be shooting actual fruits, so:

Bring your camera, macro, tripod, flash, you know all the necessary gear.

Also bring some fruit that when sliced, shows some transparency.

A white plastic tray is necessary as we need to put our flashes below it to shoot through and get the effect.


Monday, September 8, 2014

Get ready to shoot the Super moon on Tuesday 9-9-14

Get ready to shoot the Super moon on Tuesday September the 9th.
Here are some tips:
Work at long focal lengths, 300 , if possible.
Put your camera on a tripod, use timer or a release.
Switch off IS or VR.
Use Manual Exposure mode.
Aperture, between f9 to f11.
Lower your ISO to 100.
Try to reach a speed fast enough (around 1/400) to start seeing the moon's actual details. If you are getting a white ball, your speed is not fast enough.
Shoot some shots to gauge your setting, mostly the speed.
Adjust your speed accordingly, till you see actual texture on the moon.
Try to tell a story, like shooting through a tree, branches, or elements that could give your a reference frame to your story.
If there is haze, do not get frustrated, it comes with the territory.
Best of luck and post on Flickr.com.